Unlocking the Art of Making Prints on Canvas: Tips and Techniques
After adding the final strokes of paint to your canvas, a rush of triumph fills you with pride for this valuable addition to your collection. As artists, we cherish our creations, each painting reflecting a part of ourselves. To safeguard such invaluable artwork, creating a backup becomes essential. Rather than tediously duplicating the piece, the best approach is to capture a digital image of your painting. This digital copy ensures everlasting storage and offers various advantages, including the ability to reproduce prints. Wondering how to make prints of your art? First, you’ll need to transform your painting into a high-resolution digital file. Fear not, for even without professional photography skills, you possess the capability to photograph your art with a little guidance and advice.
Original Art and Reproductions
As a professional photographer, it is essential to have the equipment below when photographing art for reproduction purposes.
Easel: Use for holding artwork upright and square to the camera.
Camera: Use 35 mm digital camera that has a resolution of at least 14 megapixels
Electronic cable release: Use with the camera when shooting artwork. This cable releases the shutter without shake or vibration from triggering the camera by your finger.
Tripod: Use a tripod to make things level and square in the view finder and to eliminate shake or vibration.
Light Kits: Use a lighting kit which consists of light stands, strobe heads and soft boxes or umbrellas. You can purchase this kit for under $600.00. Additionally you can use continuous light from assorted brands of hot lights. If you cannot set up a small studio inside your house then one option would be to shoot the artwork outside. Although it is not the optimal way of photographing your painting, art copy work can be achieved without lights in natural outside lighting in the shade where the area is evenly lit.
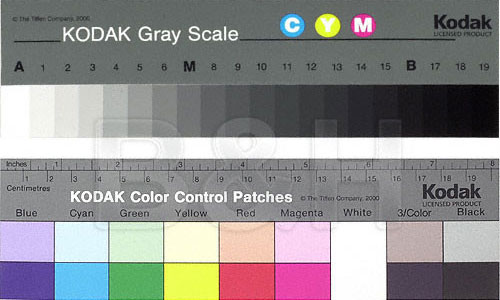
Grey Scale: Use a grey scale, as the one shown below, when photographing your artwork.
The Process for Copying Artwork into a Digital Medium
1. Mount your artwork onto the easel using a level to be sure it is upright and square to the camera lens.
2. Mount your camera to the tripod. Make sure the angel of camera is perpendicular to the painting to negate distortion. If the camera is angled up or down even slightly, this will cause the image to look warped.
3. Frame and position with the tripod to fill the view finder with the painting. When you look in the view finder, be sure the subject fits perfectly meaning the painting will be square and even on all four sides.
4. Photograph the artwork with the grey scale in the frame of your shot.
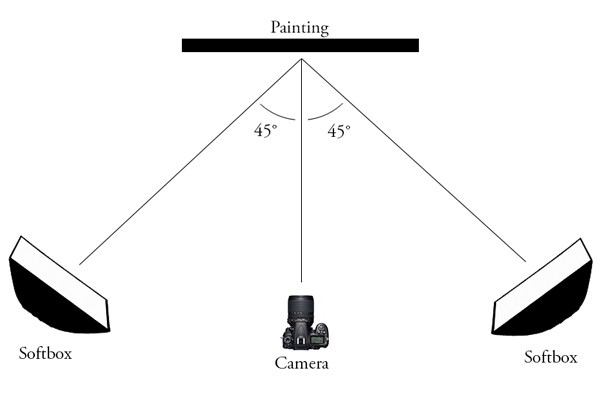
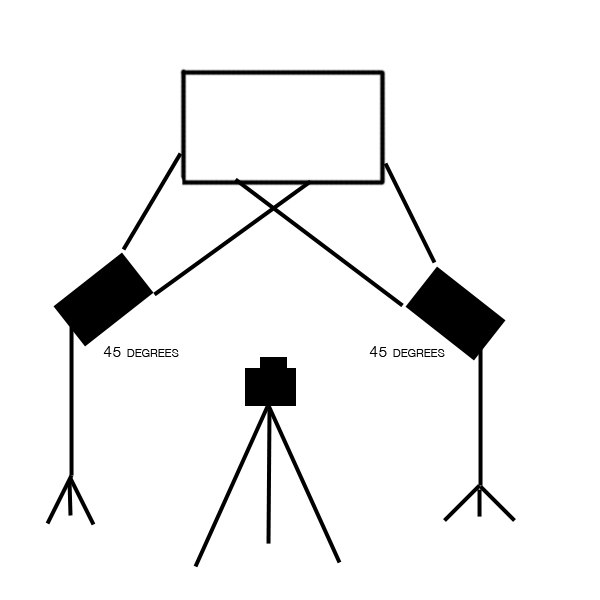
5. If using lights, position them at 45 degree angles bouncing the light equally into the umbrellas or soft boxes and back onto your art. Lighting is key. Remember what you see is what you get so before making your exposures, be sure lighting is even by using a light meter or by measuring the distance of the lights from the subject you are photographing.
6. If shooting outside without lights, make sure the light on your painting is even distributed. The surface of the painting may have a reflective quality so beware of light kicks and shine. This would blow out your highlights, thus leaving no detail for printing.
7. With your camera’s built in light meter, you can achieve your desired exposures. With strobe lighting you will need a light meter to determine your exposures.
Refer to the diagrams below for steps 1 – 7
If you do not wish to photograph artwork yourself you can send your art to us! Canvas Giclee Printing is a professional printing studio that provides art copy work service.