An important technique for any photographer is being able to balance and crosslight sunlight, unless of course you plan to take all of your pictures and night!
Before we learn how to tame sunlight, let’s take a look at what TTL, on-camera fill flash does so we can have a basic understanding of the concept to better understand how we can expand it. Now this is nothing against TTL, mind you. There are situations for which it is clearly the best solution. But I cringe at the thought of all of that technology being brought to bear on what turns out to be a boring photo because the light was coming from on-axis.
You have seen the photo before, in the back of your camera or flash manual. It’s usually a very nonthreateningly beautiful female Japanese model, posing by a railing with a background of, say a nice lake or harbor scene and perhaps a sailboat or two. The before-and-after photos show the ugly, raccoon-eyes look of the model in the evil and photo ruining harsh sunlight and the improved-but-still-sterile TTL-Matrix-Balanced-Computer-Assisted-Patented-Photographer-Brain-Softening fill light.
Raccoon eyes are the problem, and the pat solution is to pop just enough light in there to fill them. The camera calculates the basic, ambient exposure and pops in a little fill at, say, 1.7 stops down. It fills the harsh shadows and leaves that little “flash twinkle” in the eyes.
But really, with harsh sun and one flash you can do so much better. Even keeping the flash hard (with no umbrella) you can get some very cool looks by going off camera, and you only have three decisions to make:
1. At what angle do you want your strobe light and sunlight to hit your subject?
2. How bright to you want to set your ambient?
3. How bright do you want to set your flash?
Boy, that there’s some real rocket science right? No, it’s not. It a simple series of choices that can leave you with some super cool-looking mid-day photos. Let’s run through the thought process and take a look at some of the results you can get.
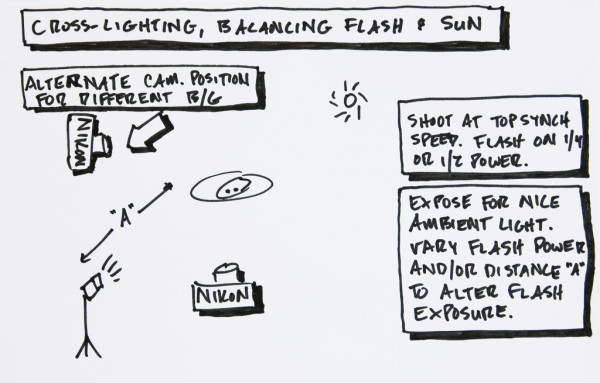
It’s good to start with the sun coming from behind your subject, out of the frame, on the back/right or back/left side. You’ll be throwing hard sunlight against hard strobe light, so lighting-wise you do not care which is coming from where. But your subject would probably rather not look right into the sun.
(The choice to go back right or back left is going to be made by which background you prefer, given the differing sun positions.)
Immediately, you will want to go to your max synch speed, giving you the most open aperture possible and allowing your flash to do the most work with the least output. (This is where having a 500th of a sec sync — or higher — at your disposal pays real dividends.) But 1/250th will work fine, too. Below that, it starts getting tougher.
Ambient will be next on the list, but for right now make sure you grab a decent background exposure and go with it. Remember, you’re at your sync speed, so you will do this with the aperture on manual.
This is not some compromise, namby-pamby, mama’s boy, try-to-keep-everything-in-range exposure, either. Expose for the sky and environment and let your subject’s foreground exposure fall where it may. Make the environment look good. You’ll be fixing the foreground in a minute.
This is also the background/separation light for your subject. So do pay a little attention to how that light looks skimming off of your subject, too. You’ll be surprised at how good that back/rim looks coming of of the sun side of your subject when you do not have to worry about the shadows in the foreground.
Now, bring your flash in from the opposite side (a little high and at about a 45-degree angle to start) and set it on, say, 1/2 power, with no light mods attached. (You do not have enough power for an umbrella unless you are in very close or you are rocking some serious watt-seconds.) You can warm it with a gel a little if you want. Maybe a 1/4 CTO.
When getting the photo you want, it’s not always an equipment thing. It’s a brain thing.
Of course, sync-wise, Nikons and Canons do the wireless thing very well at close range. And this is a situation where your sync connection is gonna be pretty much bullet proof. So definitely use this as a way to amp those family pix if you are so-equipped. You do not even need a stand, either — just a bystander to hold the flash and point at your subjects!
Exposure-wise, your flash has to be pretty close to correct. But you have a half-stop range either way, so don’t get too hung up about it. Also, after you nail the exposure, move the strobe around a little to find the best lighting angle/height to make your subject look the way you want.
But the exposure on the ambient/background — that’s another story.
You may have seen some photos that look almost 3 dimensional, this happens because the sun and the flash are painting the subject from opposite sides, which allows you to adjust the ambient exposure to let your subject pop as much as you want.
The flash exposure still needs to be on target, but play a little with the ambient portion. It’s the concept of straight crosslighting (instead of straight, on-camera fill) that gives you the look. As long as you shoot on the 3/4 (or 1/4) angles to the lights, you are gonna get a really nice, 3-D effect with this light. The ambient light level, which defines the feel of the photo, is up to you.